In part 1 of this series we built out a basic backend using KeystoneJS. In this part we will go ahead and start a new React frontend that will interact with our backend. We will be using Vite. Let’s get started. Make sure you are in the authenticator folder and run the following:
$ yarn create vite@latest
yarn create v1.22.21
[1/4] Resolving packages...
[2/4] Fetching packages...
[3/4] Linking dependencies...
[4/4] Building fresh packages...

success Installed "[email protected]" with binaries:
      - create-vite
      - cva
✔ Project name: … frontend
✔ Select a framework: › React
✔ Select a variant: › TypeScript

Scaffolding project in /home/mikeconrad/projects/authenticator/frontend...

Done. Now run:

  cd frontend
  yarn
  yarn dev

Done in 10.20s.
Let’s go ahead and go into our frontend directory and get started:
$ cd frontend
$ yarn
yarn install v1.22.21
info No lockfile found.
[1/4] Resolving packages...
[2/4] Fetching packages...
[3/4] Linking dependencies...
[4/4] Building fresh packages...
success Saved lockfile.
Done in 10.21s.

$ yarn dev
yarn run v1.22.21
$ vite
Port 5173 is in use, trying another one...

  VITE v5.1.6  ready in 218 ms

  ➜  Local:   http://localhost:5174/
  ➜  Network: use --host to expose
  ➜  press h + enter to show help
Next go ahead and open the project up in your IDE of choice. I prefer VSCodium:
codium frontendGo ahead and open up src/App.tsx and remove all the boilerplate so it looks like this:
import './App.css'

function App() {

  return (
    <>
    </>
  )
}

export default App
Let’s start by building a card component that will display an individual token. Our goal is something that looks like this:
We will start by creating a Components folder with a Card component:
$ mkdir src/Components
$ touch src/Components/Card.tsx
Let’s go ahead and make a couple updates, we will create this simple card component, add some dummy tokens and some basic styling.
# src/App.tsx

import './App.css'
import Card from './Components/Card';
export interface IToken {
  account: string;
  issuer: string;
  token: string;
}
function App() {

  const tokens: IToken[] = [
    {
      account: '[email protected]',
      issuer: 'Github',
      token: 'AJFDLDAJKFK'
    },
    {
      account: '[email protected]',
      issuer: 'Example.com',
      token: 'KAJLFDJLKAFD'
    }
  ]
  return (
    <>
      <div className='cardWrapper'>
        {tokens.map(token => <Card token={token} />)}
      </div>
    </>
  )
}

export default App
# src/Components/Card.tsx
import { IToken } from "../App"

function Card({ token }: { token: IToken }) {
  return (
    <>
      <div className='card'>
        <span>{token.issuer}</span>
        <span>{token.account}</span>
        <span>{token.token}</span>
      </div>
    </>

  )
}
export default Card
# src/index.css
:root {
font-family: Inter, system-ui, Avenir, Helvetica, Arial, sans-serif;
line-height: 1.5;
font-weight: 400;
color-scheme: light dark;
color: rgba(255, 255, 255, 0.87);
font-synthesis: none;
text-rendering: optimizeLegibility;
-webkit-font-smoothing: antialiased;
-moz-osx-font-smoothing: grayscale;
}
a {
font-weight: 500;
color: #646cff;
text-decoration: inherit;
}
a:hover {
color: #535bf2;
}
body {
margin: 0;
display: flex;
place-items: center;
min-width: 320px;
min-height: 100vh;
background-color: #2c2c2c;
}
.cardWrapper {
display: flex;
}
.card {
padding: 2em;
min-width: 250px;
border: 1px solid;
margin: 10px;
background-color: #333333;
display: flex;
flex-direction: column;
align-items: baseline;
}Now you should have something that looks like this:
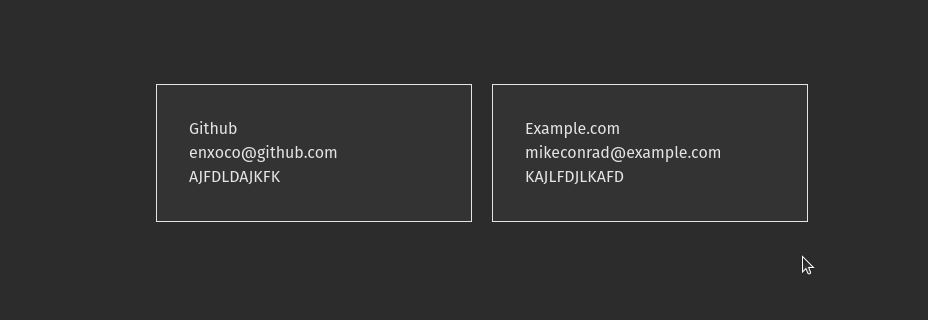
Alright, we have some of the boring stuff out of the way, now let’s start making some magic. If you aren’t familiar with how TOTP tokens work, basically there is an Algorithm that generates them. I would encourage you to read the RFC for a detailed explanation. Basically it is an algorithm that generates a one time password using the current time as a source of uniqueness along with the secret key.
If we really wanted to we could implement this algorithm ourselves but thankfully there are some really simple libraries that do it for us. For our project we will be using one called totp-generator. Let’s go ahead and install it and check it out:
$ yarn add totp-generatorNow let’s add it to our card component and see what happens. Using it is really simple. We just need to import it, instantiate a new TokenGenerator and pass it our Secret key:
# src/Components/card.tsx
import { TOTP } from 'totp-generator';
---
function Card({ token }: { token: IToken }) {
  const { otp, expires } = TOTP.generate(token.token)
  return (
    <>
      <div className='card'>
        <span>{token.issuer}</span>
        <span>{token.account}</span>
        <span>{otp} - {expires}</span>
      </div>
    </>
  )
}
Now save and go back to your browser and you should see that our secret keys are now being displayed as tokens:

That is pretty cool, the only problem is you need to refresh the page to refresh the token. We will take care of that in part 3 of this series as well as handling fetching tokens from our backend.